Forum Replies Created
-
AuthorPosts
-
Randy
ParticipantNice work Scudie!
So no mention of a credit button, you are going to use the slug rejecter/coin switches? As you know, I prefer that method.
Also, I see you have wired the ear phone jack, this is one of the earlier emulators with audio problems? Intend to use that emulator or swap to a upgrade?
I see that this box is fitted for U.S. coins, is that common for units in Britain? I would guess there are versions adapted for Brit coins, which ones are more common/cheaper?
Randy
-
This reply was modified 4 years, 3 months ago by
Randy.
Randy
ParticipantThat looks pretty cool. A nice wallbox to start with as well. How did you create the metal extension?
Randy
Randy
ParticipantNuts, how about replacing the .cnf file with the random play .cnf
c4s07.cnf
That might bypass an issue with the coin mechanism or credit system
With random play a song should start shortly after powering on
Randy
ParticipantHmm, when I insert a SD formatted like you show I get the 2 flash loop on the error LED indicating the SD failed to initialize. It appears for the DEC you must have all 160 tracks loaded onto the SD.
You don’t get the error led flashing?
Randy
Randy
ParticipantI would add at least 10 or so if you have to do it manually. Not sure why the software would not work to load them automatically, maybe some one else has solved that one.
Anyway on my SD set for coin use the SD File is:
c0s07.cnf
m00.sel (this one not needed for DEC)
names.csv (this one is just the program generated song titles)
sel001.mp3
seloo2.mp3
etc.
So your manual effort should look the same without the m00 and names files (no extra lines between selections).
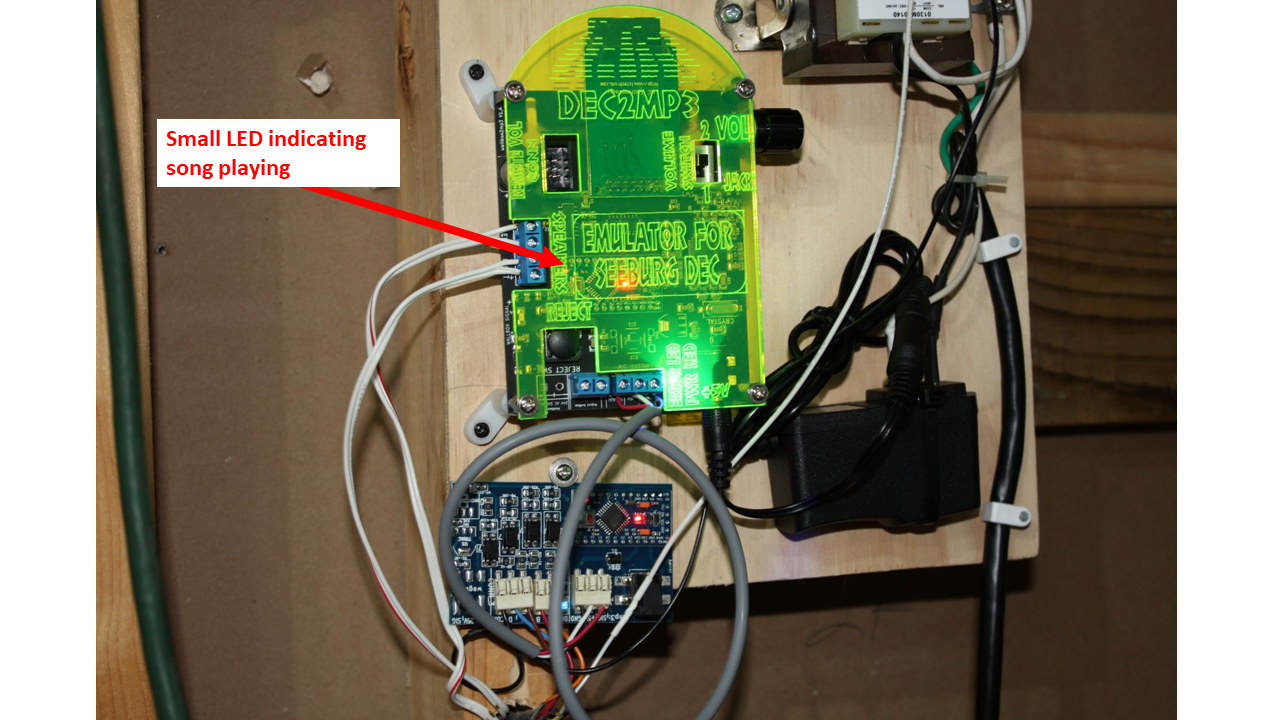
As Scudie indicated there may be an issue trying to use the onboard speaker wiring system through the Soft and Loud buttons if you have done that. I just detached the system speaker wires and connected the speakers + and – to the WB2MP3 outputs, you can see the white speaker wires in the pic.
Finally, on my system after I insert a coin and select a song a smaller red led comes on near the speaker inputs. On mine it comes on, dims very slightly as the song starts and flickers even less slightly as the song continues.
Randy
ParticipantWell, it was a little late in the evening before I noticed the post so no resolution tonight but I am sure we can get it figured out in the end.
First, why only one song and one speaker? I would suggest completing the installation by the instructions in the manual before starting to troubleshoot failures.I have a DEC with a V1.4 but from what I understand it is not significantly different in basic function to a V1.5 and I had no issues in installation.
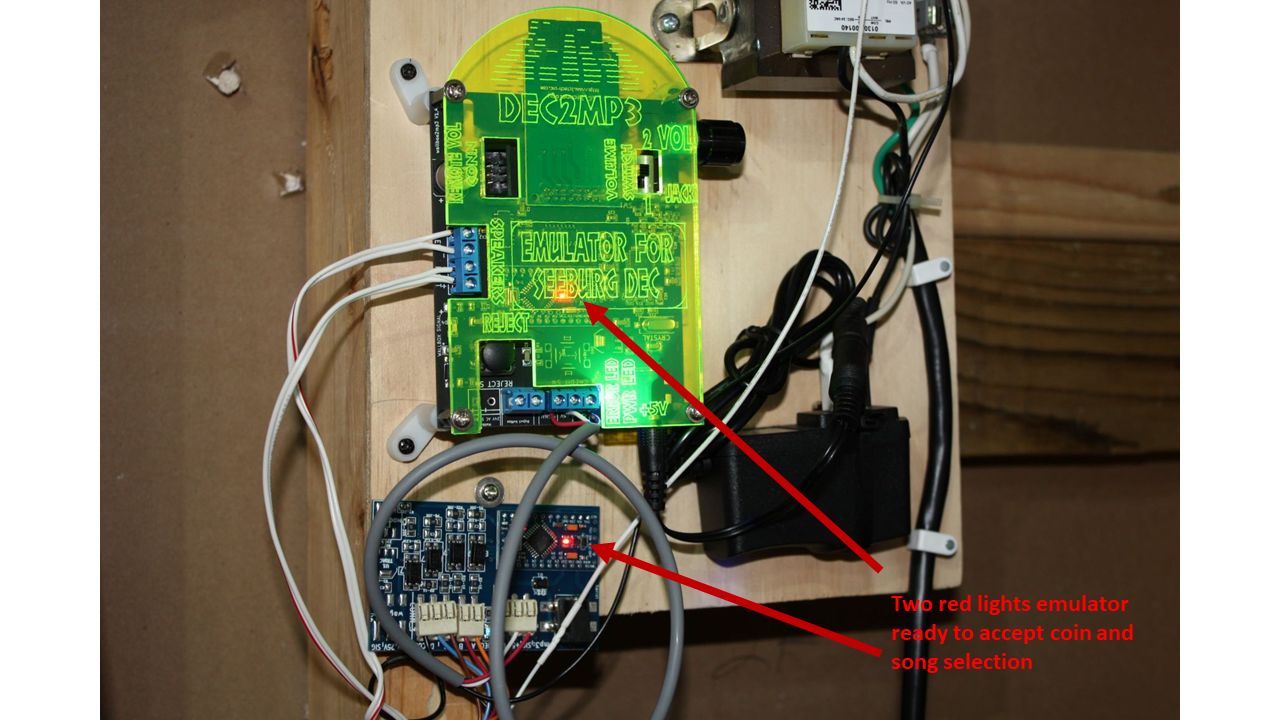
On my example I turn the power on and have two red lights showing, one on the standard emulator and one on the DEC component – is the different from what you have?
Randy
Randy
ParticipantTook a look at the one I have disassembled – the hole is only on one side of the shaft.
There is some play in the lateral movement of the drum on the other two I have. Probably to allow the wiper arm some flex as it moves over the contacts.
Randy
ParticipantWell we might not have gotten to 100% on the mechanics but you have certainly exceeded the standard on presentation!
You have a darn nice looking wallbox to start with and the setup is outstanding – good work.
I really like the bluetooth idea, I have not tried that yet but that along with the record change lead in does a great job simulating the remote play the boxes were designed for.
Randy
Randy
ParticipantWell. I’ll second that – Merry Christmas and wishes for a better coming year to all!
Randy
Randy
ParticipantAfter having thought about it some more I realized that I had been focused on voltage and resistance rather than song order, I missed that your songs were 180 degrees out of synch.
I tried a simple experiment on mine and it appears that you may just need to change where you have the red and blue (or purple as it appears in you pic) wires connected. Either at the 1 and 24 post end or the terminal block end – obviously not both.
When I did this my songs were played backwards like you described.
Might want to wait until after Xmas as it might make the whole thing explode.
Randy
Randy
ParticipantGreat, I’m glad it’s playing at at least close to right. I’m sure we can get it 100% after Xmas.
Randy
Randy
ParticipantYou may have a bad batch of resistors or a broken wire.
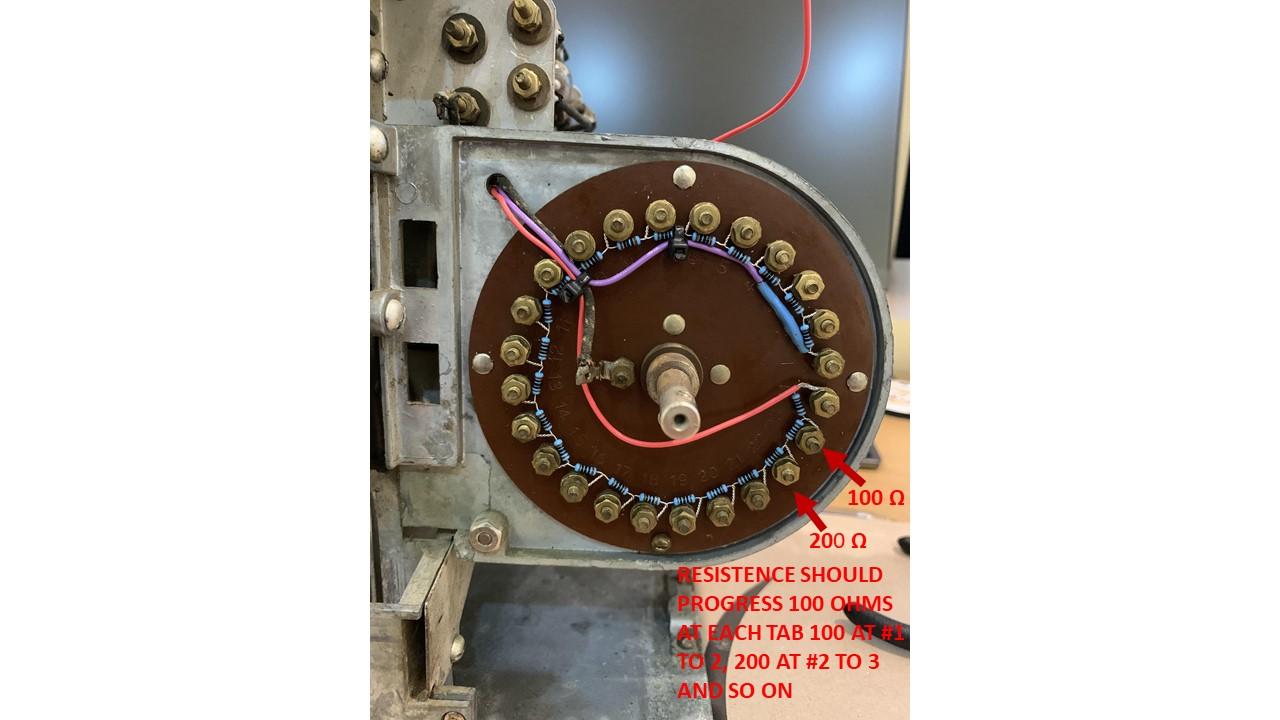
From the first post to the last should be a constant increase or 100 ohms per post up to an ending reading of 2300 on the 24 post.
With the last resistor on the blue wire you should have a reading of 2400 ohms where the blue wire is grounded on the negative terminal.
Randy
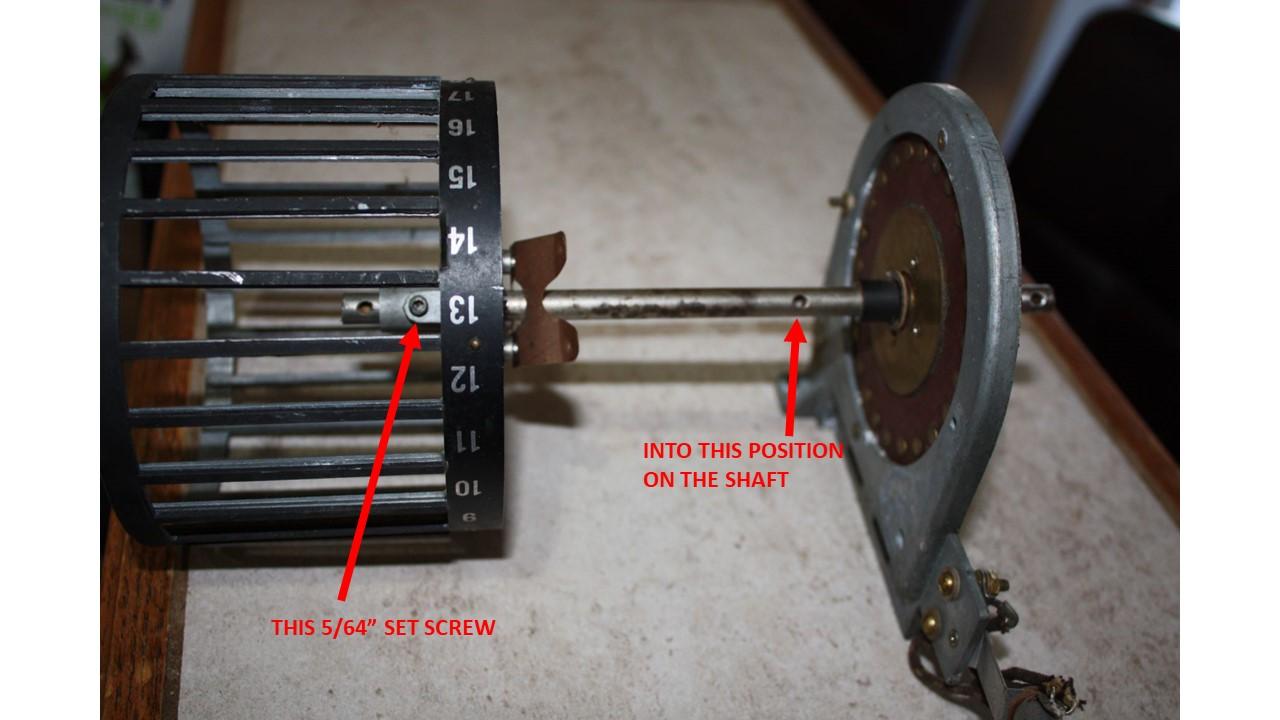
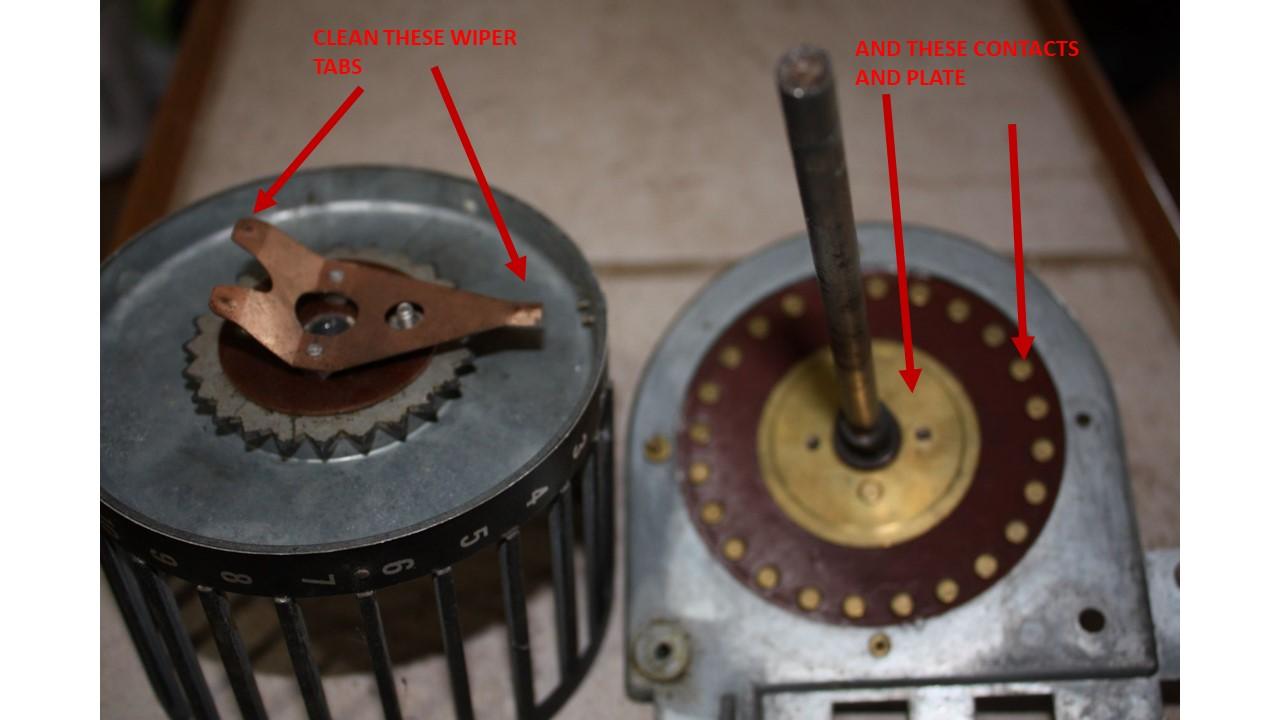
ParticipantWell that’s not good – but don’t give up hope. To remove the drum there is a set screw on a collar on the middle of the drum under the song strips that screws into a hole on the shaft – see picture.
I would just loosen the set screw and back of the drum a little to get at the contact points.
Or just spray some contact cleaner in there and try to get at them with a cotton swab.
You can also check that you are getting the proper resistance at each selection terminal, should progress by 100 Ohms as you go along.
Randy
Randy
ParticipantWell good – some progress right!
As for mounting internally I personally have not tried as I like to keep them as original as possible.
But a quick look with a spare unit I have on hand and it seems very possible. You will obviously have to remove the coin box and probably the legs of the emulator.
I have mounted one internally to a Buckley because there was enough room in that model to do so without removing anything original once I removed the legs and fashioned a small bracket to hold it in place.
Of course you will need to find a place to mount the remote pot for volume control and the momentary switch. With the coin box gone you could drill mounting holes in the back plate for those and mount them internally with access from the back of the box.
I have seen others where the entire unit was simply screwed externally onto the back of the wallbox. When sitting on a shelf it can be close to unnoticeable.
Randy
Randy
ParticipantJust to be sure we are on the same sheet of music, if you are measuring the voltage input to the emulator at the left black GND and white SIG terminals on the emulator and consistently getting the same results as in the next picture then I would say the problem lies with the emulator. If you are not consistently getting correct voltage input for each selection then it is somewhere in the wallbox. Possibly a bad resistor.
Randy
ParticipantNuts, I have not encountered this issue on the two I have done so I have not had to solve it. All I can think of is to recheck the signal and ensure it is correct at the emulator itself on the signal and earth terminals to ensure it is getting from the contact disk in the box to the emulator correctly. On mine the signal ranges from around .22 v up to 5.38 v – is that similar to what you are seeing? If the signal is getting to the emulator correctly it may be a bad board.
Maybe the contacts or pickup arms on the inside of the contact disk are dirty? You basically have to disassemble the unit to clean those effectively.
Randy
Randy
ParticipantHave you checked the voltage at each contact to confirm a consistent drop of around .2-.4v from 1 to 24?
Randy
13 December 2020 at 22 h 19 min in reply to: Pla-Mor – wiring in a free play ‘ coin bypass switch #48108Randy
ParticipantAhh, I missed that on mine, that number is the serial #, on mine it matches what is on the card. Not sure how you would be able to figure out the date on manufacture from it though.
12 December 2020 at 21 h 06 min in reply to: Pla-Mor – wiring in a free play ‘ coin bypass switch #48104Randy
ParticipantWhoops, wrong forum topic. For the Play-mor the serial # was noted on a card pasted on the outside back of the backplate. Given that you are not likely to find them intact any more. Here is a picture of one of mine. The link to history is: looks like 40-49 at about 120k.
https://www.jukeboxhistory.info/packard/wallboxes.html
12 December 2020 at 20 h 50 min in reply to: Pla-Mor – wiring in a free play ‘ coin bypass switch #48103Randy
ParticipantThe serial number should be on the data plate inside the box on the upper left hand of the back plate. My SC-2 is #162712. Not so easy to date the year of manufacture although this site claims 1962-65 for the SC-1 then states a production run of around 13ok for “SC series”
https://www.jukeboxhistory.info/seeburg/wallboxes.html#sc-1
Randy
-
This reply was modified 4 years, 3 months ago by
-
AuthorPosts
